
Recently, I was faced with a situation where I needed to clone one EPRCS pod to another. This meant that I would effectively need to perform 2 migrations: Test to Test and Prod to Prod. Here was my end goal, illustrated:

Regardless if you need to migrate from one instance to another instance within the same pod, or from one pod to another pod, the process of EPRCS cloning is the same:
- Confirm that you have everything you need in the source environment
- If necessary, back up the target environment. This environment will be completely replaced with the restore, so you should expect all previously created objects in the target to disappear.
- Download, install, and read the documentation on the EPRCS file transfer utility. This is the EPRCS administration tool that will be used for the cloning process.
- Confirm the restore time and notify users of the planned outage in the target, if necessary
- Download the backup snapshot from the source instance. (You may have to schedule a new backup if you have recent changes in the source environment.)
- Upload the source snapshot to the target instance
- Confirm the restore process and time
- Wait and verify that the restore worked. Communicate to users.
- Adjust the daily maintenance window, if required
Let’s walk through the detailed steps, starting with step #4.
Step #4 – Confirm the Restore Time and Notify Users
On the target EPRCS environment, navigate to the Daily Maintenance area. Since this is a brand new pod, my default daily maintenance window is set to some non-local time zone, UTC, and during that time zone’s nightly hours – in this case, 9pm (5 hours ahead of my current time zone):

This means that my nightly backups are currently set to 4pm local time, which is not optimal. I’ll have to adjust the formal backup time later once I’m done with my restore.
But first, a segue. EPRCS does not follow all of the same conventions that the rest of EPM Cloud does when it comes to backups:
- First of all, it doesn’t use EPM Automate as the administrator utility (at least, not yet) to automate and download backup snapshots. It has its own utility, called the file transfer utility.
- In addition, with EPM Cloud there are generally rules governing how many nightly backups (those triggered by Oracle’s system automation) can be done per 24-hour period. EPRCS allows you to trigger the Oracle automated backups at the top of any hour by changing the selection within the daily maintenance window.
- Next, with other EPM Cloud products, you can do an on-demand partial export of artifacts or full system backup via the web interface or EPM Automate. With EPRCS, you can schedule full system backups at the top of the hour via the web interface, export individual artifacts manually through the web interface, or export and download individual artifacts on-demand through the file transfer utility.
- Finally, with other EPM Cloud products, you can upload, see a list of, and choose any existing backup snapshot to restore from. In EPRCS you cannot see a list of uploaded backups. You also have to upload the snapshot that you wish to restore from through the file transfer protocol in order to trigger the restore with that backup.
I’d like my restore to occur later today, so I’ll choose 5pm and then also switch the time zone to my local one. Now that I know when the restore is going to occur, I can communicate it out. If users are attached to the target EPRCS environment, you will want to notify them of the planned restore (outage) time. The restore should not take longer than 1 hour.
Step #5 – Download the Source Snapshot
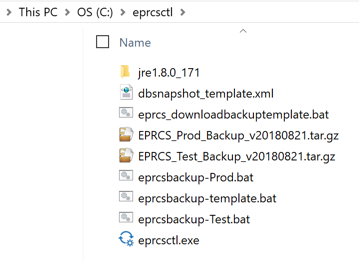
Now it’s time to download the source instance snapshot. To do this, I will use the EPRCS file transfer utility. I’m going to use the commands that don’t require a separate XML file. The syntax for this utility is quite simple – check out the online documentation if you need more information. Here is my easy peasy batch script that will download the source instance snapshot (where the parameter “server” refers to the source EPRCS instance URL, “tenantid” refers to the source EPRCS instance domain, and “secret” refers to an encryption passcode of my personal choosing):

I double-click my batch file and it runs successfully for the source Prod environment. Remember that I have to do this twice since I’m cloning an entire pod. I then create another batch script for the source Test instance and run that one as well. Then I rename and date the snapshots so I know what environment they belong to and when I downloaded them.
Step #6 – Upload the Snapshot to the Target Instance
Now that I have the snapshots, I will need to create batch files that will upload the source snapshots to the target EPRCS pod.
Here is my easy peasy batch script that will upload the source instance snapshot to the target instance (where the parameter “secret” specifies the exact same passcode that I used in my download snapshot batch script, “server” refers to the target EPRCS instance URL, and “tenantid” refers to the target EPRCS instance domain):

I double-click my batch script and it runs successfully for the target Prod environment. I then create another batch script for the target Test instance and run that one as well. A confirmation indicates that my uploads were successful:

Note: a snapshot upload automatically triggers the scheduling of the EPRCS restore process, and EPRCS will use whatever snapshot was uploaded through the file transfer utility and whatever time is selected in the daily maintenance window. If you don’t want the system to perform the restore, you’ll need to cancel it from the daily maintenance area before it’s scheduled to start.
Step #7 – Confirm the Restore Time and Process
Now that my housekeeping is done, I’m going to indulge my OCD and confirm that the restore is really set up correctly. You can do this from the daily maintenance area:

As you can see, the restore is set up to occur using the snapshot I just uploaded (although the upload timestamp looks off). I can change the time to whichever suits me best, up until the scheduled hour. As mentioned before, I have the option to cancel the scheduled restore up until the moment that it will execute.
Step #8 – Verify that the Restore Worked and Notify Users
At 5:30pm local time (these run pretty quick, although you should probably wait the full hour), I go into my EPRCS instances and confirm that my objects have migrated over. Depending on your exact migration situation, you will want to check for your objects via the EPRCS library since the Recent and Favorites lists may not migrate over. (Note that current tasks and messages also didn’t migrate over.) You will also want to randomly test your objects and security to ensure everything is working as expected.
If it’s applicable, notify the users that the target environment is back up and running.
Step #9 – Adjust the Daily Maintenance Time (if necessary)
Since I temporarily adjusted the daily maintenance time for a restore, I will need to go reset it now for the nightly scheduled backup. For my company, this window makes sense in the 2am-5am time frame. In the daily maintenance area, I can also verify that the restore occurred and when it finished:


Upload Assistance. I took a backup from the oracle demo store (using the demotools.jspx site) and when trying to upload using file transfer utility to my own instance it fails since I believe we do not know the “secret”. Can you assist?
LikeLike
I have not attempted to restore the GSE demo to our pod, and I can see multiple reasons why it might fail. I would log a ticket in the GSE Support site to see if they can provide better guidance.
LikeLike
I figured it out. You need to use single quotes for the file transfer utility on the secret, where oracle does not have a secret on the backup export you can take…secret=”
This way the syntax sees the secret line and interprets as null. I was using double quotes and that did not work.
LikeLike
Thanks for sharing!!!
LikeLike