
Today, let’s take a look at the steps for creating an EPBCS Standard application. If you’re interested in the steps for creating other types of EPBCS applications, take a look at these blog posts:
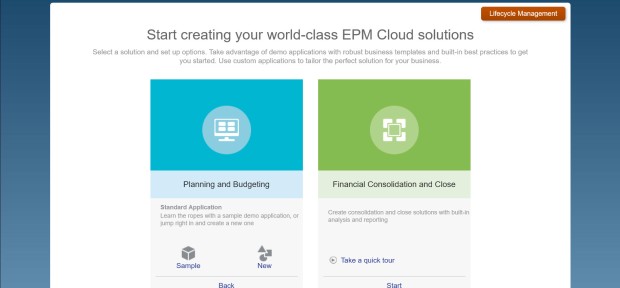
First, to recap the basics: when you first log into EPBCS for the very first time, you’re taken to a screen that can be a bit confusing. You’re asked if you’d like to create a Planning and Budgeting or Financial Consolidation and Close application.

We’re going to go the Planning and Budgeting route. Once I press Start, I see several options available to me:

- Lite – described as “all-in-one planning and reporting models that you can expand over time”
- Standard – (PBCS) described as “elaborate flexible models for any business process”
- Enterprise – (EPBCS) described as “built-in planning and budgeting models for [each framework]”
Let’s create a Standard application this time around. But this option has one deviation that the other types don’t: I can choose to create either the Sample or a New custom application:
The Sample will install the sample application components, which give folks new to EPBCS a playground to get comfortable with before implementing their own custom application. I’ll choose New.
The wizard screens are very familiar and they are mostly repetitive for each type of application creation. First, I need to choose a name (up to 8 characters), as well as a required description.

Next, I can choose the details about the application. This is where each type of application deviates.
For a Standard application, there are several options for planning frequency. The sub-options to the right of planning frequency change based upon my selection. I can also choose to enable a rolling forecast (and set the duration), multicurrency (with 2 options, including the new Simplified currency conversion option), choose the names of the 2 default plan types, and decide to enable sandboxes.

I’m going to turn off multicurrency.
Next, I have options to customize my dimension list, as well as enter or upload individual dimension members:
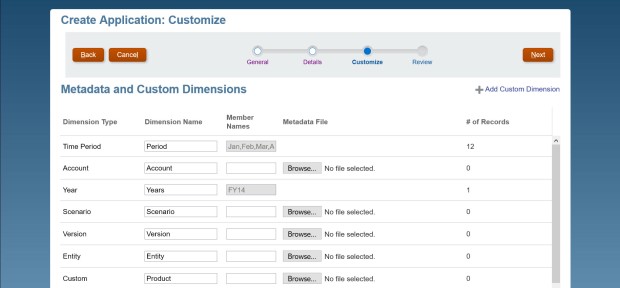
Note that I found an “undocumented feature” here. Notice that I chose to include a custom Product dimension above. However, no custom dimension loaded. In order to get this to load, make sure that at least one member name has been entered into the box or a metadata file has been selected for upload (with members in it). You can also easily add custom dimensions after initial application creation.
Then I get a summary of my results and create the application.


This process takes just over 3 minutes. I get a message indicating that everything was successful.

The Standard application is similar to your regular old PBCS application. The PBCS documentation (the EPBCS documentation is currently unreleased to the public and skips over application types) reveals several important notes about Standard applications in the PBCS world:
- You can have up to 7 plan types (3 BSO and 4 ASO)
- You can add up to 20 total dimensions
- Supports custom calendars, business rules and allocations, and member formulas
- This can later be converted to the Enterprise application type. You cannot convert backwards to a Lite application type, however.
Note that I’m assuming that the PBCS documentation is correct when it comes to EPBCS Standard applications. Without the proper full testing and finalized EPBCS documentation, it’s all we can rely on now.
What’s clear about this type of application is that it’s clearly PBCS. It comes out of the box with the standard Planning dimensions of Account, Entity, HSP_View (for sandboxes), Period, Years, Scenario, and Version. They are mostly empty.
Scenario comes with the following members:

Version comes with the following members:

HSP_View (enabled with sandboxes) resembles the PBCS standard HSP_View dimension:

When the Simplified multicurrency option is selected, Account comes with pre-configured members related to currency conversion:
![]()
When the Simplified multicurrency option is selected, Currency comes with pre-configured members related to currency conversion:

Period and Years resemble the selections I made during application creation.
These dimensions are automatically configured as part of the Input cube. The ASO reporting cube comes with everything except the HSP_View and any custom dimensions by default – I can choose to add the custom dimensions later if I wish.

I look through the objects and notice that there aren’t any pre-configured dashboards, task lists, forms, rules, or reports yet, but I expected this. Part of this is due to the options I selected in the initial application creation. For instance, if I had chosen to configure multicurrency with the Simplified option I would see a form that allows for exchange rates input. The other reason is due to frameworks. I notice that the option to configure frameworks is missing from the Console card, so that’s not even possible within this application type. There won’t be any pre-configured components for those. However, you can take a Standard application and migrate it to an Enterprise application type later. There are some considerations that have to be made prior to the conversion – whether or not the application uses: sandboxes, custom time periods, and the standard or simplified multicurrency option, to name a few

There is more to investigate, but these are the basics of the Standard application. Tomorrow we’ll take a look at the Enterprise application type.

2 thoughts on “EPBCS Series: Creating a Standard Application”